5.01 Creating a Quote
Once you have established a Client (Company) and a client (User) you are ready to create a Quote.
If you have not established a Client or client (User), refer to the applicable Tutorial below:
Tutorial 1.03 Setting up a Client
Tutorial 1.05 Setting up Users
Go to Menu/Quote/Create a Quote
Click +NEW in the top right-hand corner.

A new Quote screen will open up to allow details to be entered.
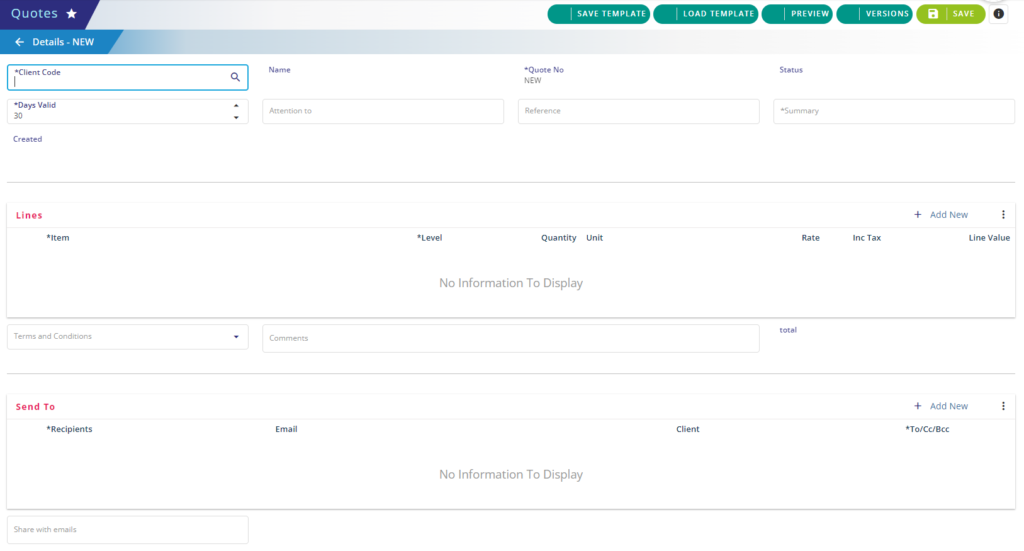
The following detail fields can be selected or populated as required:
- Client Code – if you have created Clients, applicable options will appear when you click on the Search icon. Once selected, the Company name will auto-populate
- Quote No. and Status – these fields will be auto-populated once the Quote has been saved
- Days Valid – number of days until Quote expiry (default setting from your Account set up)
- Attention to – add the contact details for the Client
- Reference – a Quote number or code of your choice
- Summary – a Quote description associated with the Reference field
- Created – will be auto-filled once saved
Lines
Click ‘Add New’ in the top right corner to add a new Item line.
You can have Items built to use as defaults which will populate the Quote Line if configured. This can be done in Items in the Drive Lynx Quote Portal.
The following fields apply to the Lines component:
- Item – name that represents the product or service (can select from existing Items list if configured)
- Level – choice of drop down menu options: Header, Line, Sub Total or Text within the Quote
- Quantity – amount of product or service for the Item line
- Unit – choose from drop down options for selection of charge unit (e.g., Hours, Days, Each)
- Rate – cost in dollars
- Inc Tax – uses default percentage setting for Tax Exemptions in Account
- Line value – will auto populate based on Quantity and Rate
Simply click ‘Add New’ to add additional lines as required.
You can, at any point, PREVIEW the quote. This will open a new tab in your browser displaying a preview of the Quote in progress.
- Terms & Conditions – you can set these for selection in Quote Portal/Terms & Conditions otherwise the standard default option will be populated
- Comments – optional field for any fulfilment instructions relating to the Quote
Send To
- Recipients – who will receive the Quote once it’s sent. Click on ‘Add New’ to add a recipient line. Select from the drop down options for the associated Client. Select whether you want them to be a To, Cc, or Bcc on the Quote email. You can add or remove (Delete) as many Recipient lines as required.
Tip: If you are not seeing the customer or staff member you require, it could be because you have not linked the User to the Client account. Visit Profile Set Up/Clients (users will need to be configured as the ‘Main contact’ or in ‘Quote Recipient’ settings against the Client.
Additional recipients, such as project managers or external addresses can be added via the ‘Share with emails‘ field if needed.
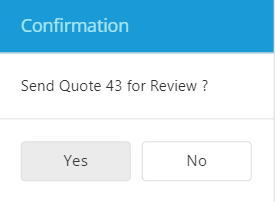
Select SAVE in the top right to complete the Quote.
The User can choose to save the quote as a ‘Draft’ (the Quote will remain on this status) or send for ‘Review’ if finalised.
Draft Quotes can be updated or modified at any time prior to being sent for Review.
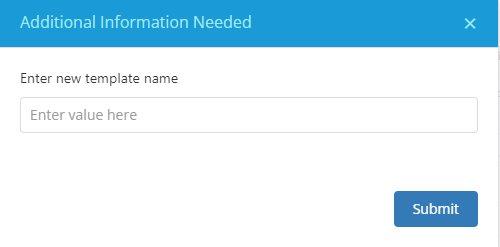
You can select SAVE TEMPLATE if you would like to re-use the same information on future quotes.
When creating a new Quote from a template, select LOAD TEMPLATE and choose from your list of previously saved template names.
Review a Quote
Once saved (and sent for Review), a Quote will go onto a status of ‘Review’. Email notifications will be sent to system users configured to review quotes.
The Quotes screen will also be used to review and send approved Quotes to your customers.
Select REVIEW from the top buttons or from the Queue options when you access the Quotes screen. Click on the applicable Quote line and once reviewed, can be sent to the Client via ‘Send’ or if changes are required can be set to ‘Re-work’ for changes. A Re-work reason will be required to notify the creator that the quote has been rejected or needs amendment.
The Quote will be on a Rejected status and notifications will be sent to advise applicable users that the Quote needs to be reworked and has not been sent. The Quote can be updated and saved again for review as required based on the Rejection Reason entered.
This process can continue until the Quote is approved and sent to the Client for final acceptance.
A typical Quote could be updated with the following Statuses applied based on individual processing:
- Draft (once the Quote is saved and has not been sent for review)
- Review (when the Quote is sent for internal review)
- Rejected (if changes are required to the Quote)
- Sent (once the Quote is sent to the Client for acceptance)
- Approved (once Quote has been accepted by the Client)
- Expired (if Quote is not accepted by the set Expiry Date)