4.02 Creating a Service Ticket
Once all your Service Portal Settings have been updated, you are ready to create service tickets.
Tickets will most often be created by Customers who require support or assistance from your business (see Tutorial 1.02 Setting up your Account), although all other Access levels (except Resources) can raise tickets if required.
In this tutorial, we will cover the minimal fields required.
Once logged in, click on the hamburger Menu tab in the top left-hand corner.
Click on Service Portal/Tickets
Click in +NEW in the right-hand side of the top menu.
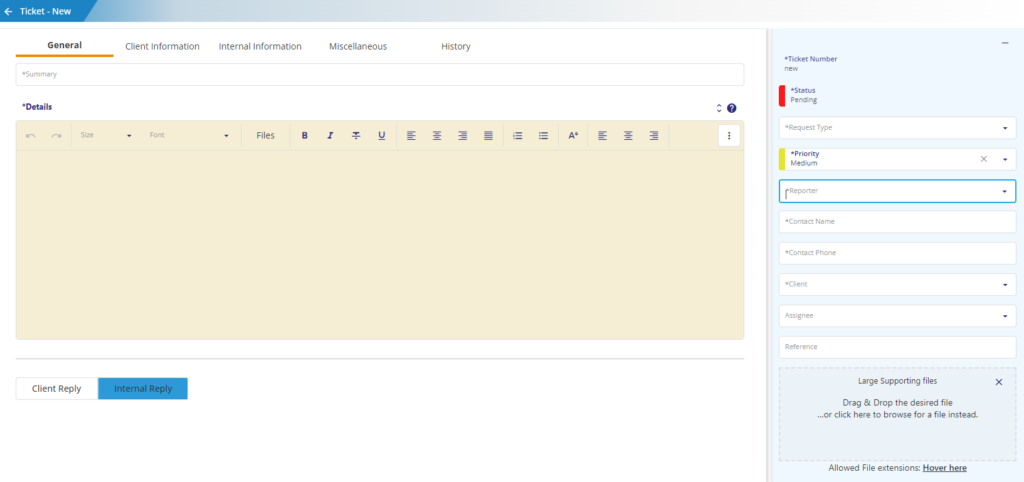
The following fields will be required to be selected or entered:
- Request Type – as configured in Request Type setting
- Priority – will display default set in Priorities setting
- Reporter – will display your User Id but can be changed if required
- Client – who the request is for (field will default for Customers)
- Assignee – User to action the request (not displayed to Customers)

Contact (Name and Phone) details and Ticket Status will be auto-populated (based on User/Reporter details and the default Status configured in Statuses setting).
Reference – is a free text, non-mandatory field that can be used by your business and could include any form of identifier, number, reference or code specific to the Ticket request.
The following fields are mandatory and will be required when creating the Ticket:
- Summary – a short description of the request
- Details – this is where you can add full details of the request or issue along with any information that is applicable.
Images, screenshots, documents, files and other attachments can be linked to the Ticket for informative purposes as required.
The following file types can be attached to a Service Ticket:
- ‘.jpg’
- ‘.jpeg’
- ‘.gif’
- ‘.png’
- ‘.pdf’
- ‘.txt’
- ‘.doc’
- ‘.docx’
- ‘.xls’
- ‘.xlsx’
- ‘.csv’
- ‘.zip’
- ‘.mp4’
Once all the fields have been updated, click on SAVE in the right-hand side of the top menu to send the ticket request.
The ticket is now active and a Service Agent can update the Assignee and Status as required.
Emails will be sent to all users linked to this Client as well as the Customer to advise the Ticket No. along with the request details.
As the Status of the ticket progresses, notifications will be sent to all relative parties whenever the ticket is updated based on the system configurations (refer to Tutorial 4.01 Service Portal Settings for more information).
This includes any comments added by Clients or the subscription Account holder along with any changes made to any of the Service Portal fields up until the time of ticket completion.