2.01 Creating a Project Plan
Once you’ve followed the Setting up your Account and Setting up Clients tutorials, you are now ready to set up your first Project Plan.
(If you do not intend on using Project Planner, you can move onto the tutorial 4.01 Setting up Your Ticket System as this is the only other module that can be used as an independent Drive Portal).
We recommend that you start with a typical project in your line of business that can be saved as a Template for new projects.
In this tutorial, we will cover the minimal fields required.
Once logged in, click on the hamburger Menu tab in the top left-hand corner.
Click on Planning Portal/Project Planner
Click in +NEW in the right-hand side of the top menu.
Click on Blank Project (you can select From Template once you have templates saved).
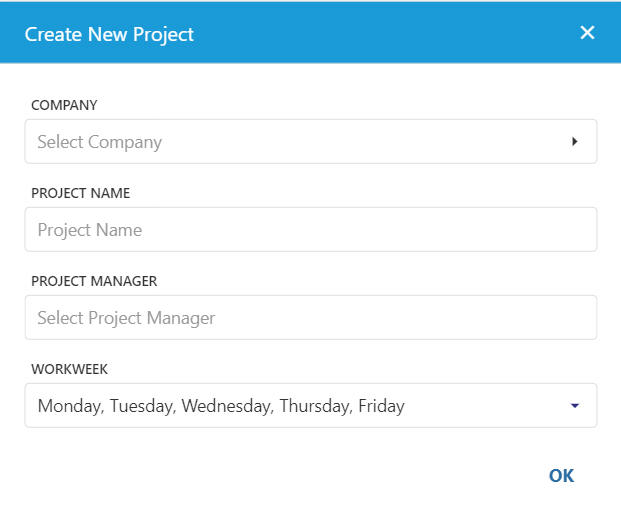
A pop-up box will appear requesting that you enter some Project details, including:
- Company – select the Client for the project (see Tutorial 1.03 Setting Up a Client)
- Project Name – the designated Project name (will be displayed in the Project List)
- Project Manager – option to assign multiple Project Managers or Administrators
- Project Start Date – date the project is to commence (if creating project from a template)
- Template – option to select applicable saved template
- Workweek – Days of the week that your project will be in operation
The above are required fields. However, you can edit these selections later, if you wish.
Updating and Adding a Task
The first Task will be auto-created from the above entries as a copy of your Project Name. This will ensure that the Project will appear as the top item of the Project Schedule when Exported to PDF or Excel.
Right click on the Task to add the following:
- Task Information (includes Task Name, Start/End Dates, Dependencies, Resources and Notes)
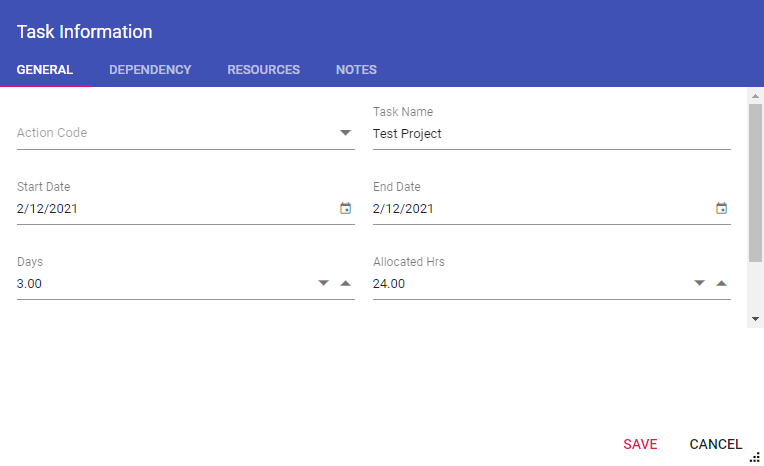
Ignore the Action Code option for now. This is a detailed configuration of a pre-set Task. You can learn more about Action Codes in Tutorial 3.01 Setting Up Actions.
Click Save to update any changes.
- Add a Task (Above, Below or create a Child Task as part of a Project Phase)
- Delete a Task (if required)
- Convert to a Milestone

As displayed above, for each new task added, enter the Task Name, Start Date and Duration (estimated number of days to complete the Task, which will auto populate the End Date).
Click Save.
Repeat this action for multiple tasks.
An existing task (e.g., the Project Name Task) can be configured as a Phase by adding Child tasks to the Project Task line ID.
We suggest that all Phases be added as Child Tasks under the original Project Name Task. From there, additional tasks can be added as Child Tasks to each Project Phase as required.
Creating a Child Task
Right click on a Task to create sub tasks that are required for more specific details and timeframes. This will result in the original Task becoming a Project Phase (and will display in bold).
You can add as many Phases/Tasks to the Project as required.
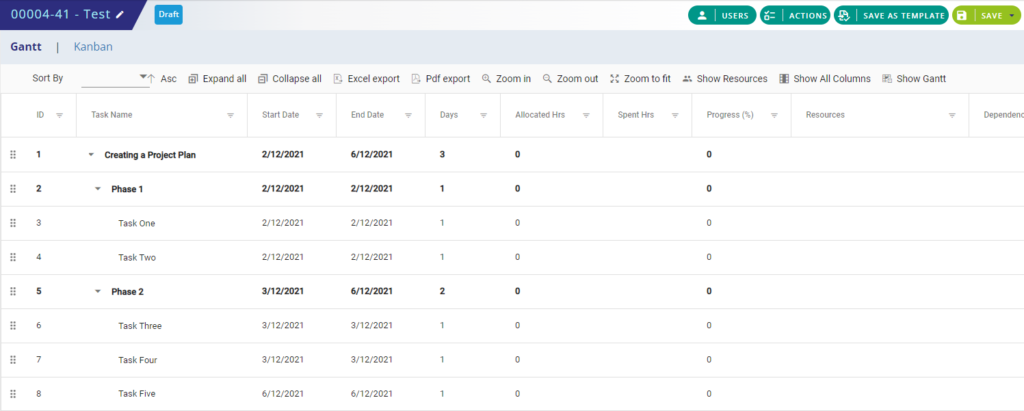
Right click on the Task to save as a Milestone, which will appear on your Project Plan Gantt Chart as a Diamond symbol.
Creating Dependencies
A Task Dependency is assigned where a Task is dependent on another Task to commence, complete or happen in tandem.
Click the Dependency tab within the Task Information window.
Enter or select a Task for which the new task will be Dependent.
Select a Type for the Dependency – is the new task Dependent on the former task’s completion?
You can edit these options at any time through Task Information to update, add or remove a Task Dependency.

When ready, click Save in the right-hand side of the top Menu. There are two options:
- Save (will save the Project as a Draft version and can be done at any time)
- Save & Release (once Resources are allocated to a Project, Save & Release will prompt your Drive Lynx portal to automatically send email notifications or mobile APP notifications to Resources who have been assigned to the Project’s Tasks)
Since, in this Tutorial, you are setting up a Project Plan for the first time and do not have any Resources, the Save & Release option will be for your reference only.
It’s a great idea to Save As a Template if you would like to use this plan as a base for any new Project Plans. Click on Save as Template in the top Menu and allocate a Template Name.

The Project Plan Template will be saved for future use.
Click on + NEW (for new Projects) and select From Template from the drop-down menu, this will open up a new ‘Create Project from Template’ box and allow selection of a previously saved Project Template for use.
Once a Project has been saved, Drive Lynx will display the Project Plan in a new vertical Menu (Project List) within the Project Planning Portal for easy access.
Any further updates or changes to the Project will send new email notifications when applicable (e.g., allocation of, or changes to Resources responsible for Tasks).
Visit Tutorial 3.01 Actions to learn about more options to manage Project Plans in your Drive Lynx system.